So one of our favourite clients is the Yukon's very own, Air North. If you haven't flown with them yet, do yourselves a favour and just book a trip to anywhere they fly...they have CHEESECAKE AND COOKIES PEOPLE!
Last year around this time, we were finishing up a shoot of their new flight attendant uniforms and I had mentioned to Christopher, the art director, that it would be super rad to park their flagship aircraft out on the tarmac in front of the mountains and make a really cool image.
They'll never go for it...
A few days later, Christopher sent me an email saying that it was a go... he said we could have the aircraft for a few hours after their last flight, and gave me a few date options. After I finished my little celebration dance in front of the computer, I started thinking about the logistics of trying to get this set up with our wonderfully unpredictable weather.
Ok giant plane, Yukon sky to show off our awesomeness here...That shouldn't be hard right!? Well, it turns out that it takes a bunch of people, a bunch of time to actually get the aircraft out there in place, and a lot of time for us, with all of our gear setup and ready to go, so to say the least, not something that we could just make happen at the drop of a hat any given night when the the sky decided to clear... The best we could do is just decide to pick a night and hope for the best.
So we picked a date, I lined up the help I was going to need, and Christopher sorted out the details on the Air North side.
Holy crap, I had a multi-million dollar aircraft at my disposal to photograph however I wanted too!
What do the hell do I do?!
I figured I better start trolling the internet for inspiration.... turns out, there are not too many cool photos of Airliner type aircrafts out there (except from the manufacturers).... fighter jets, ya, but nothing like what I was thinking. So I ended up finding inspiration for some really cool luxury car photographs, particularly from
Tim Wallace's work. In the end, I figured what I wanted to do was to light the whole aircraft in sections, and then do a mother of a composite, and piece it all back together with the lovely Yukon Scenery in the background. I put together a quick mock up of the shot so I had a rough idea of how I wanted to position the aircraft... cause it's not like a car that you can just hop in and move if its not quite in the right spot...
 |
| Mmm Mockups.... |
Ok I had a plan!
So the night came to shoot the aircraft.... the weather was nice and we had a few hour window starting around 10:30pm to get everything we needed. So the plan was to position the aircraft, find my angle, get some base shots while the sun was on the mountains and then start lighting the plane. Everything went quite smooth and the night turned out to be beautiful to boot! We spent 2hours making over 500 images of lighting the plane from every possible angle we could think of!
Wish I would have known I wouldn't use a single one of them...
It turned out that the ambient light from the sun when we got there was so beautiful that it looked way better than what I was going to piece together in photoshop anyways! SO I used one of the first frames we took! The only downside to this way nicer than expected evening, was that the sky was almost completely cloudless. As it turns out, when making a dramatic picture, blue sky kinda blows...
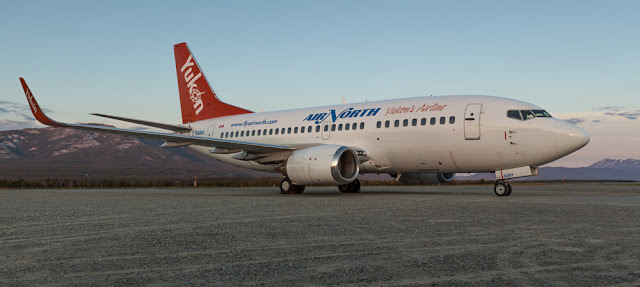 |
| Blue sky=kinda boring |
Mission: Find a better sky.
This wasnt too hard, as a few weeks later we were coming back into town from a different shoot (so I actually had a camera with me) and I looked up to see the exact sky I was hoping for...so I pulled over and took a few frames on the side of the highway...Boom, I had my sky!
 |
| Purple Sky!! |
Ok here's where things became a bit tough.... as this was a personal project, meaning no actual solid deadline, it took me quite a while to actually get to the processing part as our other work projects never really slowed down long enough for us to have 'personal project' time. (whatever that is....) Then there was the fact, that after all of that, I couldn't decide on a specific way I wanted it to look, so with all of those things combined, it led to letting the project sit on the back burner for the enitre winter...
Insert busy, snowy season here.
1 year later.....
Ok back into it...We gotta finish this plane shot! Christopher wrote us on Twitter!
So, the first thing I did was extract the plane from the image so I could maipulate it cleanly with out affecting the background.
 |
| Ohhh naked plane.... |
Then I took my purple sky photo, and overlapped the tarmac ground layer onto the image.
 |
| BOOM tarmac. |
Then I brought back in the mountains by isolating them with a layer mask so they could be edited separately.
 |
| Don't forget them mountains... |
After sprucing up the plane image a bit, accentuating it's shine with some dodging and burning I added the plane layer back on.
 |
| We're getting there... |
Next in order to finalize the image, I worked some more photoshop and lightroom shinaz (that's business talk for tweaking perspective, adjusting highlights and shadows, adjusting clarity and desaturation, etc.) in order to really make the plane pop and the sky have even more contrast to get that really dramatic feel....and here you have, one year later, our Air North Boeing 737 500 shot!
HUGE thanks again to Air North and everyone who helped us out that night with the photo shoot. It was one of our favourite collaborations to date...